Ensuring EMI/EMC Compliance in Industrial PCBs: What Are the Key Design Considerations for Electromagnetic Compatibility?
PRODUCTS
pcb heater (diy joule heating)
by:Rocket PCB
2019-10-08
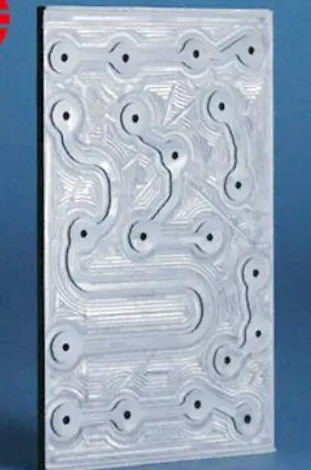
I found a website while searching online and recorded some experiments done with printed circuit boards etched on the snake pattern above, using them as heaters.
The use of a heater like this may be: to drown in the liquid and heat it.
Possible hot bed for 3D printer?
It heats the resistance in the simplest form, which is basically the same as heating the high current through the resistance, and the resistance heats.
It\'s doing the same thing on a printed circuit board, but it\'s bigger.
* I made a promotion for bad pictures * First of all, I took a look on the internet to see if there are available vector format images with snake pattern, but I can\'t find them.
I\'m in Eagle soon (
Design Procedures for designing printed circuit boards and schematic diagrams)
This is a simple pattern with traces of winding patterns that can provide resistance.
Once the current is applied to this point, it will heat up.
I have included the Eagle file below and for those who don\'t have the eagle on your computer, I have provided a picture. PNG format.
I then print this pattern on a smooth photographic paper and transfer my design to a copper-clad board using the common \"toner transfer method.
There are several simple steps to this method: 1.
Print out your design on the laser printer, inkjet printing does not work, it is better to use smooth paper (
Or use a page in a magazine)2.
Place your board design on a copper-clad board and iron for about five minutes at the hottest temperature to make sure all Toner has been transferred. 3.
Put your board in cold water for a few minutes and wipe the paper off.
You should leave the design on the copper bag board. 4.
Etching the board using the etching agent of your choice.
I use iron chloride & as described in the \"techshop ji\" instructions, I use this method faster & use less etching agent. 5.
Once your motherboard is etched, remove the remaining toner, there are several ways to do this.
I use a mixture of steel wool (
Reduce toner to a rough standard)
Then clean the board with acetone to make sure there is no toner on the board.
Once your circuit board is etched and cleaned, you can drill and weld it.
This design is very simple, only two holes need to be drilled. I used a 1.
I purchased 0mm drill bits from Maplin Electronics for £ 10 and £ 2. 50.
I used a standard cordless screwdriver for drilling, but you can use dremel or the tool of your choice.
These little bits are very easy to break, so use them carefully.
After drilling, I check the continuity with a multimeter to make sure the circuit board is not broken.
I measured its resistance with my fluke multimeter & when heated to full temperature it measured 8 ohms to 13 ohms.
To make the most of this heater, you need a power supply with a high current.
I have tested 3 so far: ATX power supply and it heated quickly to a good temperature.
Easy to buy and cheap. A \'Wall-Wart\' -
Rated DC 12 V, 1. 2 Amps -
It was quickly heated, medium temperature, too hot to touch.
Xbox 360 Power-12 Volts 16. 5 Amps (
It says on the label)
I will rate it as best in the other two.
I also tested it with a 12 volt car battery, but it didn\'t run very well.
I\'m going to build another one with a similar pattern, but a larger one.
I will also build a high current power supply for it.
The design is very flexible as it is very large and my only 10 cm by 6 cm but will make the water very hot.
I intend to use a better power supply & I believe this can be used to boil water.
Thanks for reading. . .
Custom message
Related Products